Category: Blog

  • My First Quilt!

    My First Quilt!

    Last year my local library held a yarn and fabric swap, so I went to see what they had and to drop off some fabric. There wasn’t much yarn on offer, but several large tables were pushed together to display a wide array of fabric. There were large pieces and small scraps and everything ranging from polyester knit to thick upholstery fabric. The organizers had thoughtfully arranged the bits of quilting cotton by color and encouraged me to take whatever I wanted. I chose a pile of pink and red fabric scraps for a quilt that I might make “someday”.

    A quilter's workspace including large and small squares of quilt fabric, a rotary cutter, acrylic rulers, and cutting mat.

    “Someday” arrived at the end of December when I bought 2 acrylic square rulers and started cutting my fabric stash into 8 1/2″ and 4 1/2″ squares. I did that for about 2 days, with Netflix documentaries playing on the t.v. next to me. To my amazement, my bits of fabric resolved into 2 orderly piles, and with the addition of 2 yards of muslin from my stash I was forming a solid plan.

    A quilter's workspace including a vintage Singer sewing machine and squares of quilting cotton in the process of being pieced together

    I sewed the 4 1/2″ squares into four-patches, and ended up with almost the same number as my 8 1/2″ squares. I played with a few different layouts in my mind, and on graph paper, until I settled on a checkerboard arrangement. Then I cleared a space on the floor and spent a day arranging and rearranging the squares, until I liked the placement of the colors and patterns. Even with a completely random assortment of scraps I managed to create a perfectly uniform pattern, with clear diagonals running in both directions across the quilt top.

    A sewing machine and stacks of patchwork quilt squares with post-it notes on top of each stack

    After determining the final layout, I gathered up all my squares by rows and marked them with post-its so I wouldn’t get confused about the sewing order. I was still worried that I would make a mistake and mix up the layout, so I spent every spare minute sewing the squares into strips and sewing the strips to each other until it was done, so I wouldn’t forget. I did mix up the order once, but at that point I had enough of the squares put together that I could see my mistake right away and fix it.

    Quilt batting, muslin backing fabric, patterned binding fabric, and a finished patchwork quilt top all folded and neatly stacked

    One week after I started cutting my fabric I had a finished quilt top! With 9 squares wide and 10 squares long it measured about 72″ by 80″. I bought 3 yards of 90″ wide muslin for the backing, which shrunk a few inches after washing, and a package of Queen size cotton batting. Then I spent a weekend joining the layers with safety pins and basting stitches.

    A photo of the finished quilt top showing the diagonal arrangement of 8 inch squares and 8 inch four-patch squares

    I had to wait a week for a walking foot to arrive in the mail, and then I started quilting. I was really worried that it would be difficult to manage such a large piece of fabric, sew straight lines, and keep the layers from shifting, but it wasn’t as hard as I thought it would be. The worst part was rolling up the sides of the quilt to fit on my machine and supporting the weight of it while I sewed. I finished the quilting in two days, trimmed the edges, and folded the backing over to make a self-binding.

    The finished quilt draped over a futon

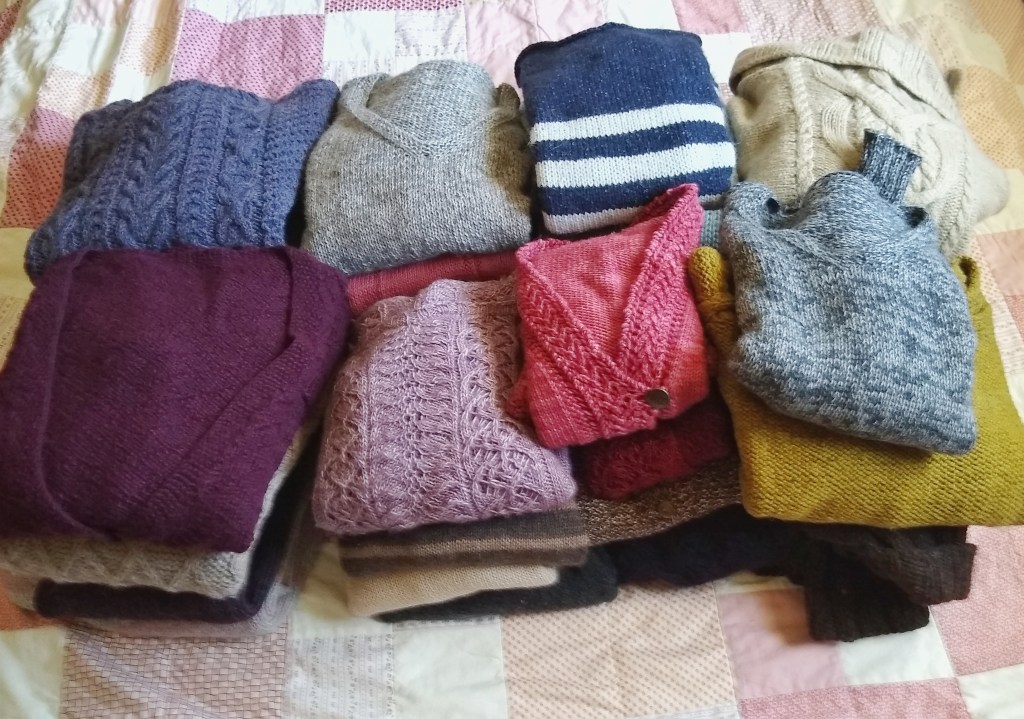
    I LOVE my new quilt! It’s lightweight and warm, and the colors make me so happy! Making a quilt was easier and more fun than I expected, and I am already planning the next one.

    Thank you for reading about my quilting adventure! Next time we will return to our regularly scheduled knitting.

  • The Orthagon Wrapper

    Part shawl, part blanket, the Orthagon Wrapper is a generously sized, rectangular “shlanket”. Simple garter stitch stripes in varying widths are turned at right angles by working a series of increases. The unusual construction and finishing details of this piece make basic garter stitch anything but boring!

    Copyright Harper Point Photography/Interweave

    For the sample I used Blue Sky Fibers Baby Alpaca, a luxuriously soft sportweight yarn, in the colors Navy Blue and Blue Cheese. My original design idea was in black and white, but I love these soft blues together! Blue Sky has a range of sophisticated heathered colors in this yarn, so there are lots of possible combinations.

    Copyright Harper Point Photography/Interweave

    The Orthagon Wrapper is a lot of knitting, but it’s mostly meditative garter stitch. Even though the colors are changed frequently for the stripes, there are not a lot of ends to weave in because the color not in use is carried up the side of the work and hidden inside the i-cord edging. Working each half of the shawl separately keeps the work a manageable size.

    Copyright Harper Point Photography/Interweave

    Grafting in garter stitch is a little bit different from grafting in Stockinette, but it really isn’t difficult. The editors at Interweave have provided detailed directions and a diagram to simplify the process. You’ll find this pattern, and nine others, in Wool Studio Volume VI.

    Copyright Harper Point Photography/Interweave

    I hope you enjoy knitting this new pattern as much as I enjoyed making it!

    Thank you for knitting!

  • Me Made May

    Me Made May

    For the last few years I’ve been watching in awe as people post pictures of their handmade wardrobes on Instagram for Me-Made-May. It started on the So-Zo blog ten years ago.  “Me-Made-May is a challenge designed to encourage people who make their own clothes to develop a better relationship with their handmade wardrobe. You set the specifics of your own challenge to make it suitable and useful for YOU. However, one very common pledge is for a participant to aim to wear one self-stitched or refashioned garment each day for the duration of May.”

    I don’t have enough self-stitched items in my wardrobe to wear one every day, but I do want to develop a better relationship with my hand made wardrobe, so I decided to participate this year. This is my pledge: I, @kephrenknitting, sign up as a participant of Me-Made-May 2019. I endeavour to honestly assess my wardrobe, donate or repurpose the garments I don’t like to wear, and plan new pieces to coordinate with the garments I don’t wear enough. At the end of the month I intend to have a making plan for the rest of the year.

    I started by sorting my sweaters. I have a lot of them. Over the winter I sold or gave away around 20 sweaters, and I still have more than 20 left. I started knitting about 13 years ago, and in the time since then my size has changed, my style has changed, and even my skin’s sensitivity to different fibers has changed. I used to love baby alpaca, it was my favorite fiber, but now it’s too warm and prickly on my skin. I also don’t like my sweaters to be as form-fitting as I used to, and I’m not as sensitive to the cold. My color preferences have changed too. My favorite neutral used to be brown, and now it’s gray.

    These are the sweaters that didn’t make the cut because of the fiber, fit, or color.

    And these are the ones that I still love and want to wear. You can see that my new color palette is very calm and coordinated, and that’s just what I wanted. There are still some gaps in my sweater wardrobe that I plan to fill with yarns in my stash. I need to make a few short-sleeved cardigans and lightweight pullovers, so those are going to be my knitting goals for the rest of the year. I already have some ready-to-wear items in my wardrobe that coordinate with these sweaters, but I am also considering how I can create whole outfits when I sew new garments. 

    Some of my favorite ready-to-wear garments are wearing out and need to be replaced, like this this gray French Terry skirt that I’ve had for about ten years. It was one of my favorites, but the fabric was getting old and worn and starting to rip at the pockets. I made a replacement skirt in organic cotton sweatshirt fleece and it is even better than the original! I used Simplicity 8175 view C for the pattern, and I replaced the waistband and zipper with organic cotton rib knit and elastic. I left the hem raw so it naturally rolls up on the bottom. The original skirt had a raw hem that I occasionally had to trim because the French Terry frayed, but the sweatshirt fleece doesn’t!  I would love to make this skirt again in gray if I can find the right fabric.

    Having replaced the skirt, I decided to upcycle the fabric to practice making my new Hudson Pant pattern. I also repurposed two t-shirts for the waistband, cuffs, and pockets. I won’t be wearing these out of the house, but I learned how to put the pattern together and got an idea of the fit. The second pair (on the right) went together much more easily. These are both the cropped version, but I think I have enough of the white jersey to make a long version to test the length on me. 

    Once I have the fit perfected I plan to make at least three more pairs in organic cotton sweatshirt fleece. These neutral colors will coordinate with just about everything in my wardrobe.

    I’m planning my outfits and keeping notes on my projects in a design journal that I set up just like my bullet journal. This way I can take notes on my sewing projects just like I would on my Ravelry project page. The next garment on my sewing list is a button down flannel shirt. I’m taking an all-day sewing class this weekend to get help with the tricky bits, and hopefully, have a finished shirt by the end of the day! I’m excited to share more of my sewn garments with you and incorporate them into outfits for everyday and pattern photos. I hope you enjoy seeing the process!

    Thank you for knitting!

  • Hand Washing Hand-Knits

    Hand Washing Hand-Knits

    Hand washing isn’t any more difficult than machine washing. There are several different methods depending on the space and tools you have available, and I’ve tried most of them! A common misconception about wool is that it shrinks. It doesn’t; it felts. Shock and agitation cause felting, so those are the things to avoid when washing hand-knits made of wool and other animal fibers. Cotton also has a reputation for shrinking, but it doesn’t, it stretches. After you’ve been wearing your favorite jeans for a week they are stretched out, washing them and giving them a spin in a hot dryer just restores them to their natural shape. Hand washing avoids stretching and felting your hand-knits while getting them clean. It is important to keep your hand-knits clean because they will be less attractive to wool-eating bugs, but you really only have to wash them when they are dirty. I can tell when my handknits need a wash because they start to feel less soft, or they look a little stretched out. A good soak will restore softness and return your garments to their natural shape.

    Washing

    You’ll need something to soak your hand-knits in, like a sink, basin, or top-loading washing machine. I like this 4 gallon Red Gorilla tub because it can hold about as much as I have room to dry. I have also heard that high-efficiency washers can be used when set to the wool cycle. Remember that we want to avoid shock and agitation, so don’t use water that is too hot or too cold. I like to use luke-warm water for pure wool, and cool water for wool and silk blends. Fill the vessel with water first, then add your soap. A good wool wash like Eucalan or Soak is ideal because it conditions the wool and doesn’t need to be rinsed out. Now add your knits. Squeeze gently to make sure the fabric is thoroughly saturated with water, and let them soak for 20 to 30 minutes.

    A tub full of soapy water and handknits
    Knit soup

    Removing the water

    If you’re hand washing in a sink or basin allow the water to drain out and press your knits against the sides of the sink or tub to remove as much water as you can. Do not wring or twist, as that could cause stretching. Also avoid lifting your knits when they are soaking wet without supporting the full weight of the garment. After you’ve pressed out as much water as possible you’ll have to continue pressing out the excess water using towels. Lay a towel on the floor, preferably a tiled surface, then lay your garment on it in a single layer. Roll up the towel with the knits inside it and press the water out. Dancing a jig on the rolled up towel is especially effective. You may have to repeat the process with a second towel.

    If you are using a top-loading washer simply turn to the spin cycle and allow it to run until all the water has been spun out. This used to be my preferred method for hand washing because it effectively removes so much water, but now I use a spin dryer. This amazing gadget spins out so much water that even bulky sweaters dry overnight!

    Sweater drying racks holding socks and a sweater
    Sweater drying racks

    drying

    Now that most of the water has been removed, your hand-knits just need to be allowed to dry. If you were washing lace shawls you will probably want to pin them out on blocking mats or a spare bed to open up the lace to be sure the shawls dry in the right shape. If you washed sweaters you’ll still want to shape them to dry, but pins and wires are unnecessary, and can even distort the shape of your sweaters. Just spreading out your sweaters on a towel is enough to let them air dry, but I like to use sweater drying racks to allow for maximum airflow. I use these stackable sweater drying racks, but if your surface space is limited try these hanging sweater drying racks from Knitpicks. It should take between 1 and 3 days for your knits to dry.

    New Year’s Eve is the perfect time to catch up on cleaning, and I have a lot of handknits to keep clean. I’ve refined my hand washing process over the last ten or so years, and found the way that works best for me, but I would love to hear what your methods are! Please leave a comment below, and have a happy New Year!

    Thank you for knitting!

  • Compass Points Pullover

    Compass Points Pullover

    The Compass Points Pullover was published in the Fall/Winter 2018 issue of knit.wear magazine. It’s a bulky cabled sweater featuring raglan shoulder shaping, a thick and cozy funnel neck, and a long tapered waist. Cascade’s Boliviana Bulky yarn makes the knitting speed by, so you’ll be dressed in a new, warm, winter sweater in no time at all!

    The pullover is worked from the top down beginning at the neck. After a few tries incorporating neck shaping into the cable patterns and raglan shaping, I decided to save the neck shaping for last, so all of the neck stitches are cast on at once and the body is worked in the round to the hem. The raglan increases are worked before and after a column of Stockinette stitch, which continues down the sides of the sweater and highlights the waist shaping.

    When the body of the sweater is finished sleeve stitches are picked up and worked in the round to the ribbed cuffs. The cable pattern starts at the neck and continues down the sleeve to blend seamlessly into the cuff ribbing.

    The funnel neck is picked up last and short rows are used to raise the back neck. I had originally planned to make the funnel neck shorter and a single thickness, but when it was finished it was just too floppy and didn’t look the way I wanted it to, so I made the neck band twice as long, folded it over, and sewed it to the inside. Perfect! The funnel neck is thick and cozy without hugging your neck in an annoying way.

    The Fall/Winter issue of knit.wear magazine is available now in print and digital formats.

    Thank you for knitting!

  • The Bristol Raglan and Holiday Sale!

    The Bristol Raglan and Holiday Sale!

    I’ve just added the Bristol Raglan to my Ravelry pattern store. This pattern was first published in the Spring 2017 issue of Interweave Knits magazine. I’ve revised the pattern to include written directions along with the cable charts, and I’ve changed the directions slightly to make it easier to follow the raglan shaping directions and cable patterns at the same time. This pattern and all of my other independently published patterns are 30% off the regular price now through November 27, 2018. You can see all the patterns on sale here. No code needed, just add the patterns to your cart and the discount will be applied automatically at checkout.

    The Bristol Raglan is a top-down seamless pullover, worked mostly in the round. The neck is cast on first, and worked flat to create a lower front neck line, then the piece is joined and worked in the round to the underarms. Simple cables adorn each raglan seam line, and stop just before the underarm separation.

    After the body and sleeves are separated, the body of the pullover is worked in stripes to the split hem. The front and back are separated, and the back hem is worked longer than the front. A little cable detail keeps the hem neat where it splits at the sides, and a purled phony seam on each side hides the jog from the color changes.

    Three-quarter length sleeves are worked in the round from the held sleeve stitches and a provisional cast on at the underarm, but working from the top down means you can easily change the length.The pattern is available in five sizes, from 37″ to 50 1/2″ bust sizes, and it’s worked in a worsted weight yarn. You can see all the details on the pattern page.

    Thank you for knitting!

  • Lake Geneva Sweater

    Lake Geneva Sweater

    The Lake Geneva Sweater is my design for the Winter issue of Knitscene. It’s a top-down, drop shoulder, V-neck sweater, made entirely without seams. The marled effect is created by holding two strands of fingering weight yarn together. For the sample I used Cascade Yarns Sorata in Charcoal and Silver. I love the simplicity of this design and I think it will be a fun and easy knit for both beginner and experienced sweater knitters. Worked at a worsted weight gauge, this sweater goes fast!

    Copyright Knitscene/Harper Point Photography


    One of my favorite features of this design is the way the shoulders are shaped. Drop shoulders can get a little droopy (think of big shouldered sweaters from the 1980s) unless they are tapered toward the sleeve, and that is usually achieved by working short rows. For this design I did something even easier; the shoulders are worked in garter stitch and the taper is created by gradually working more stitches in stockinette stitch until only the armhole border is worked in garter stitch. The shorter row gauge of garter stitch makes the length at the armhole shorter than at the neck edge.

    Copyright Knitscene/Harper Point Photography


    The V-neck shaping couldn’t be simpler from the top down. There is no need to cast on stitches for the front neck as you would for a round neck, instead increases are worked at the neck edge until there are enough stitches to join the fronts and work in the round. The V-neck shaping was carefully planned so that it doesn’t start until the garter stitch shoulders are complete, and the fronts are joined at the base of the neck on the same row the front and back are joined at the armhole. I’m not a fan of “at the same time” instructions, so I avoid them whenever possible!

    Copyright Knitscene/Harper Point Photography


    The body of the pullover is worked straight to the hem, and the sleeves are picked up and worked in the round from the armholes, so after doing the hard work of shaping the neck and shoulders it’s all mindless stockinette. There is a little column of garter stitches on each side, which acts as a faux seam and makes a fun detail. It is also repeated on the sleeves at the underarm. Ribbed cuffs and hem complete the sweater adding to the casual, comfortable feel.

    The Winter issue of Knitscene is available in the Interweave Store, and at bookstores and yarn shops all over. Thank you for knitting!


  • The Stars Are Out Tonight

    The Stars Are Out Tonight

    Last month my bf and I went on our first camping trip of the season at Newport State Park in Wisconsin’s Door Peninsula, not far from where I live. We hiked into our campsite and had just enough time to explore the nearby trails before it got dark. Very dark. Newport is a certified dark sky park.

    Earlier this year my camera club did a module on night sky photography, when it was too cold in Wisconsin to spend any time outside at night comfortably. So when the low temperatures started to climb (just) above freezing, my bf and cinematographer booked us a night at the park during the new moon, when the sky would be at its darkest.

    The trail near our campsite skirted the edge of the lake with several clear views of the sky from small limestone cliffs. We were smart to scout it while it was still light out. With headlamps on both our heads I set up my tripod on a relatively flat rock, attempted to focus, and took several shots of the eastern night sky over Lake Michigan. It took over a minute for each 20 to 30 second exposure because I had my camera’s noise reduction feature turned on. (I later discovered that this is unnecessary.) The shots looked amazing on my camera’s tiny LCD screen.

    After we got home and I edited the photos I was a little disappointed. The stars were blurry, my compositions were boring, and the photos were very dark and noisy. It was still a good first attempt, and it gave me something to work on; by identifying what I didn’t like about my first photos I was able to focus on the areas I wanted to improve. We reserved another campsite during the new moon in June, which gave me a month to work on my astrophotography skills.


    With a little research I determined that most of my problems could be solved with a different lens, one that could take in more of the sky, capture more light, and focus better in the distance. I found a fisheye lens on Amazon that could do all of those things.

    Back in my little town, I had only a few opportunities to practice my night photography on clear nights when the moon was out of sight. I’m lucky to live right on Lake Michigan, so the light pollution is minimal, but cloud cover, rain, and the light from the moon can still make night photography difficult. I captured the photo below before moonrise, with the lighthouse and navigation buoy behind me. One of the characteristics of a fisheye lens is the distortion caused by its wide angle of view, which can be avoided by placing the horizon exactly at the center of the composition, as it is in the photo below.

    Equipped with another important piece of gear, a sturdy tripod, we headed back to Newport. This time our campsite was 2 miles from the parking lot, but it offered a clear view of the sky and our own private beach! I was able to get a clear view of the Milky Way just by pointing my camera straight up through the trees around our campsite. I am much happier with my photos from the second trip, but there are still a lot of improvements I could make, so I’ll keep practicing. Night photography is an interesting challenge, which is why I think I enjoy it so much.

    My shawl designs have always been inspired by images, either from my own memory or other photographers’ photos. As my photography skills improve I hope that I will be able to use my own photos as inspiration for my shawl designs. I can almost see the shape of a shawl in the Milky Way, can’t you?

    Thank you for knitting!


  • Sock Footage

    Sock Footage

    I like to think of myself as a sweater knitter. I knit shawls as well, but sweaters are really “my thing.” Lately though, I’ve been kind of obsessed with knitting socks. I have a good collection of sock yarn, mostly because I planned to use it for shawls or sweaters, but recently I’ve been using my sock yarn to knit socks.

    Thanks to Kate Atherley’s book Custom Socks I finally figured out how to make a pair of socks that fit me. I would always make them a little too big, so they fit my mother’s feet perfectly, and I would give them to her. Now she has a drawer full of hand-knit socks, but this pair is only the first in my own hand-knit sock drawer.

    When I told my friend Teri that I was knitting socks we decided to do a knit-along using Susan B. Anderson’s Smooth Operator sock pattern, and I cast on this pair.

    I was having way too much fun watching the stripes change from blue to white sprinkled with gold speckles, and I got ahead of Teri, so I had to put them down for a while to let her catch up. Which meant, of course, that I had to cast on another pair.

    I wanted to try Mina Phillip’s garter stitch short-row heel, so I am using her pattern for that, but I added my own texture pattern on the top of the foot and the leg. It’s not difficult, but I do have to pay a little more attention with this pair, which meant, of course, that I had to start another pair of socks for simple, mindless knitting.

    And now I have three pairs of socks on my needles, and plans for more. Webs was having a sale on Opal sock yarn, and their 50 g skeins of Valley Yarns Huntington are perfect for heels and toes.

    I am still knitting sweaters and shawls, but those are work knitting. Design samples that have to be carefully thought out and planned. Socks can be picked up whenever I have a spare minute, and put down just as easily. They are easy, portable projects that let my mind rest while my hands stay busy. I am really starting to understand the appeal of hand-knit socks. Do you knit socks?


    Thank you for knitting, and May the fourth be with you!

    Sock knitting resources

    Smooth Operator Socks

    Mina’s Vanilla Sock Recipe

    KirbyWirby Afterthought Heel

    Custom Socks by Kate Atherley

  • Summertime

    It’s been awfully quiet here on the blog lately, because I’ve been busy enjoying the summer. I hope you have too! Here are some highlights from my summer adventures.

    It has been a very stormy summer so far,

    and the clouds have been absolutely beautiful.

    Of course, there have been sunny days too.

    I’ve been spending time in our beautiful Wisconsin State Parks. This is the view from the lookout tower in Potawatomi State Park.

    I also went to Pride Fest in Green Bay.

    I walk to the lake almost every day, and I love seeing the Pelicans!

    Summer is also a great time for project photos! this is the Can Can Shawl and it’s in testing right now. I plan to release the pattern mid-August, and if you’re on my mailing list you’ll receive a discount on the pattern when it’s released.

    Of course I’m still knitting! I have a few new shawl designs planned for the Fall, and I’ve been working on a couple of sweaters for Knitscene and Knit Picks.

    I hope you’re enjoying summer as much as I am!

    Thank you for knitting!