Category: Seamless Sweaters

  • Knitting Seamless Sweaters; Four Construction Methods

    Knitting Seamless Sweaters; Four Construction Methods

    I have been a seamless knitter from the start, and I’ve often heard statements like “seams add structure” and “seamless knits will stretch out of shape.” As with most things, it depends. If you knit a garment at a loose gauge in a yarn with no memory it will probably stretch out of shape with or without seams. If structure and rigidity are what you want, hand knitting may not be the best method for creating your garment. Although you can create knit fabrics with more structure by working stranded colorwork or a slip-stitch pattern at a dense gauge, you may consider creating your garment out of a stiff woven fabric instead.

    Knit fabric is very flexible and fluid and can be shaped 3-dimensionally as the fabric is created. Rather than seeing the flexible property of knit fabric as an obstacle to overcome, I look at it as an advantage to be utilized. Knit fabric looks the same whether it is worked flat or circularly (unlike crocheted fabric) and pieces can be joined invisibly (unlike woven fabric). Seams alone will not make knit fabric behave like woven fabric, but it’s not true either that seamless knits will always stretch out of shape over time. Well-fitting, thoughtfully constructed knit garments will be both comfortable and flattering for years of wear, and constructing whole garments without a single seam is like magic!

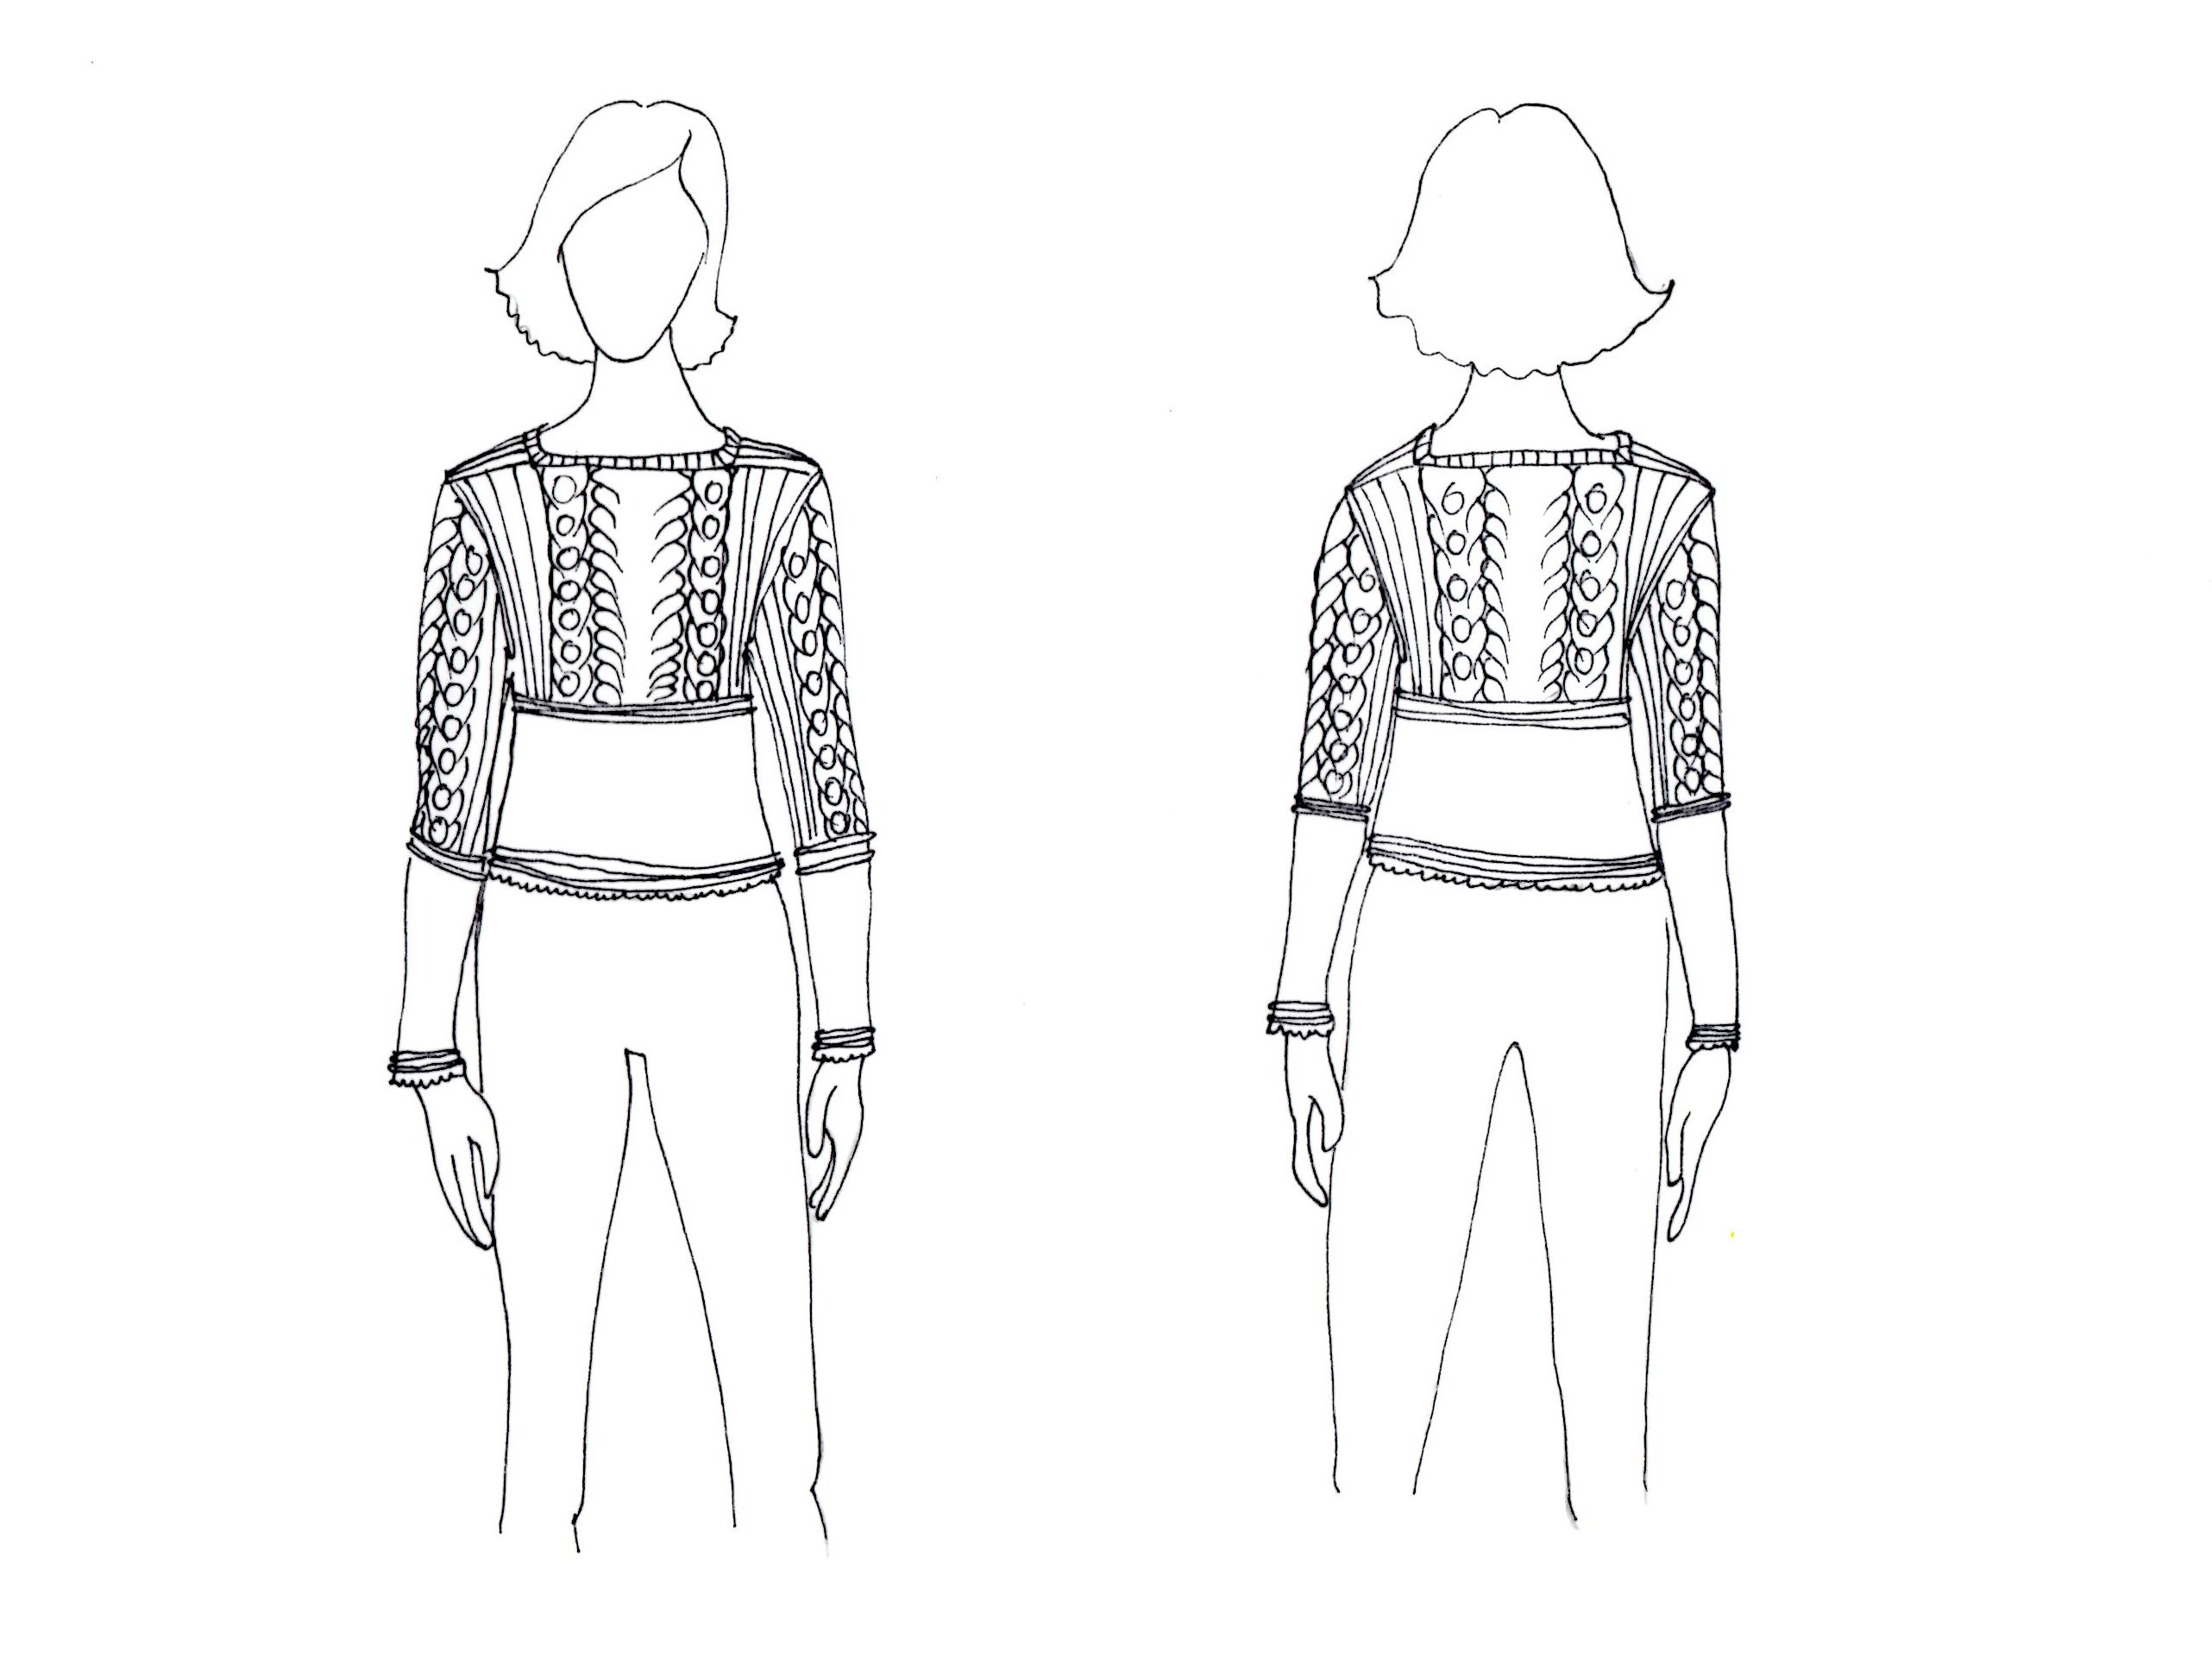
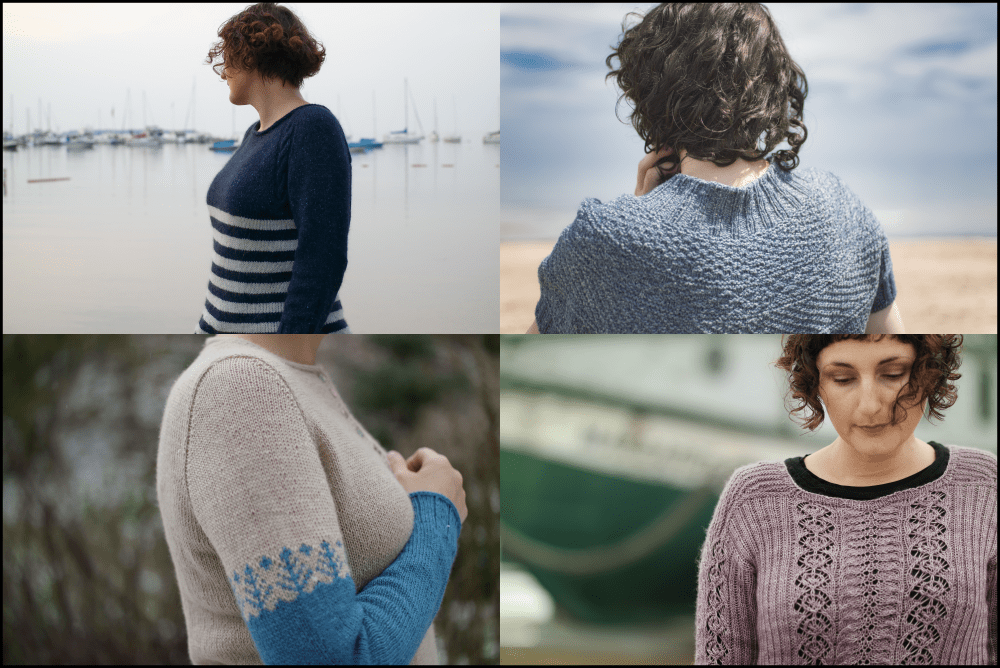
    The most crucial aspect of garment construction is the way the sleeves fit into the shoulders of a garment. This section of a garment can be referred to as the yoke, regardless of construction. Most construction methods can be worked seamlessly from the top down or the bottom up, simply by swapping increases for decreases. The main types of shoulder and sleeve constructions are: drop shoulder, raglan, round yoke, and set-in sleeve. In this post I’ve listed the characteristics of each one, and common problems to look out for when knitting and designing them.

    Raglans

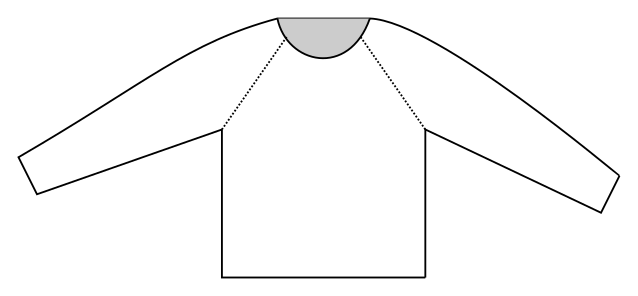
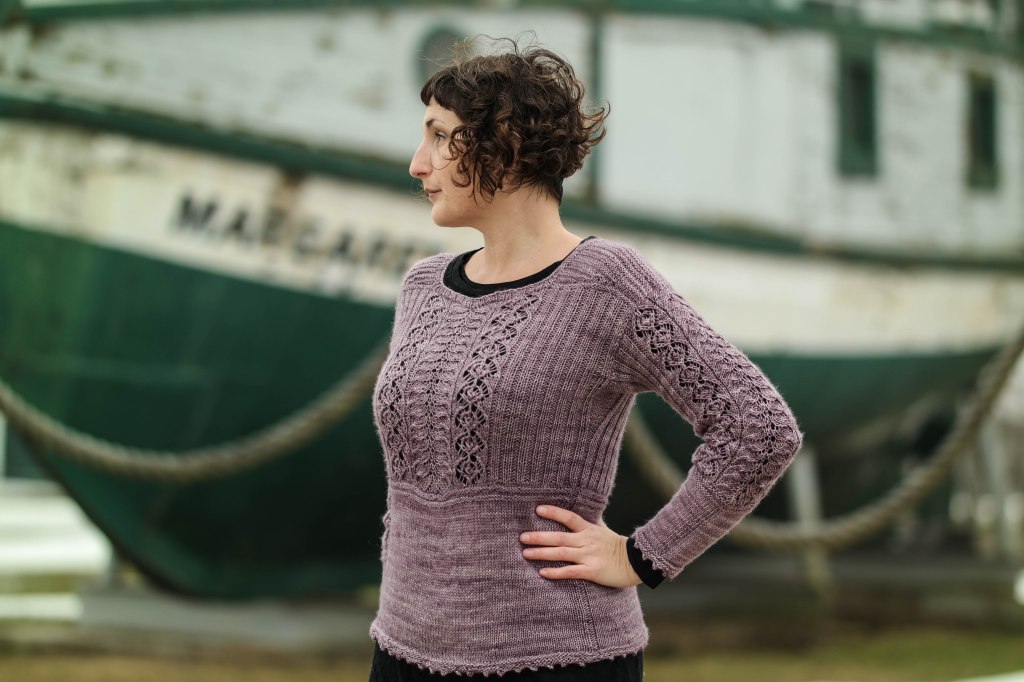
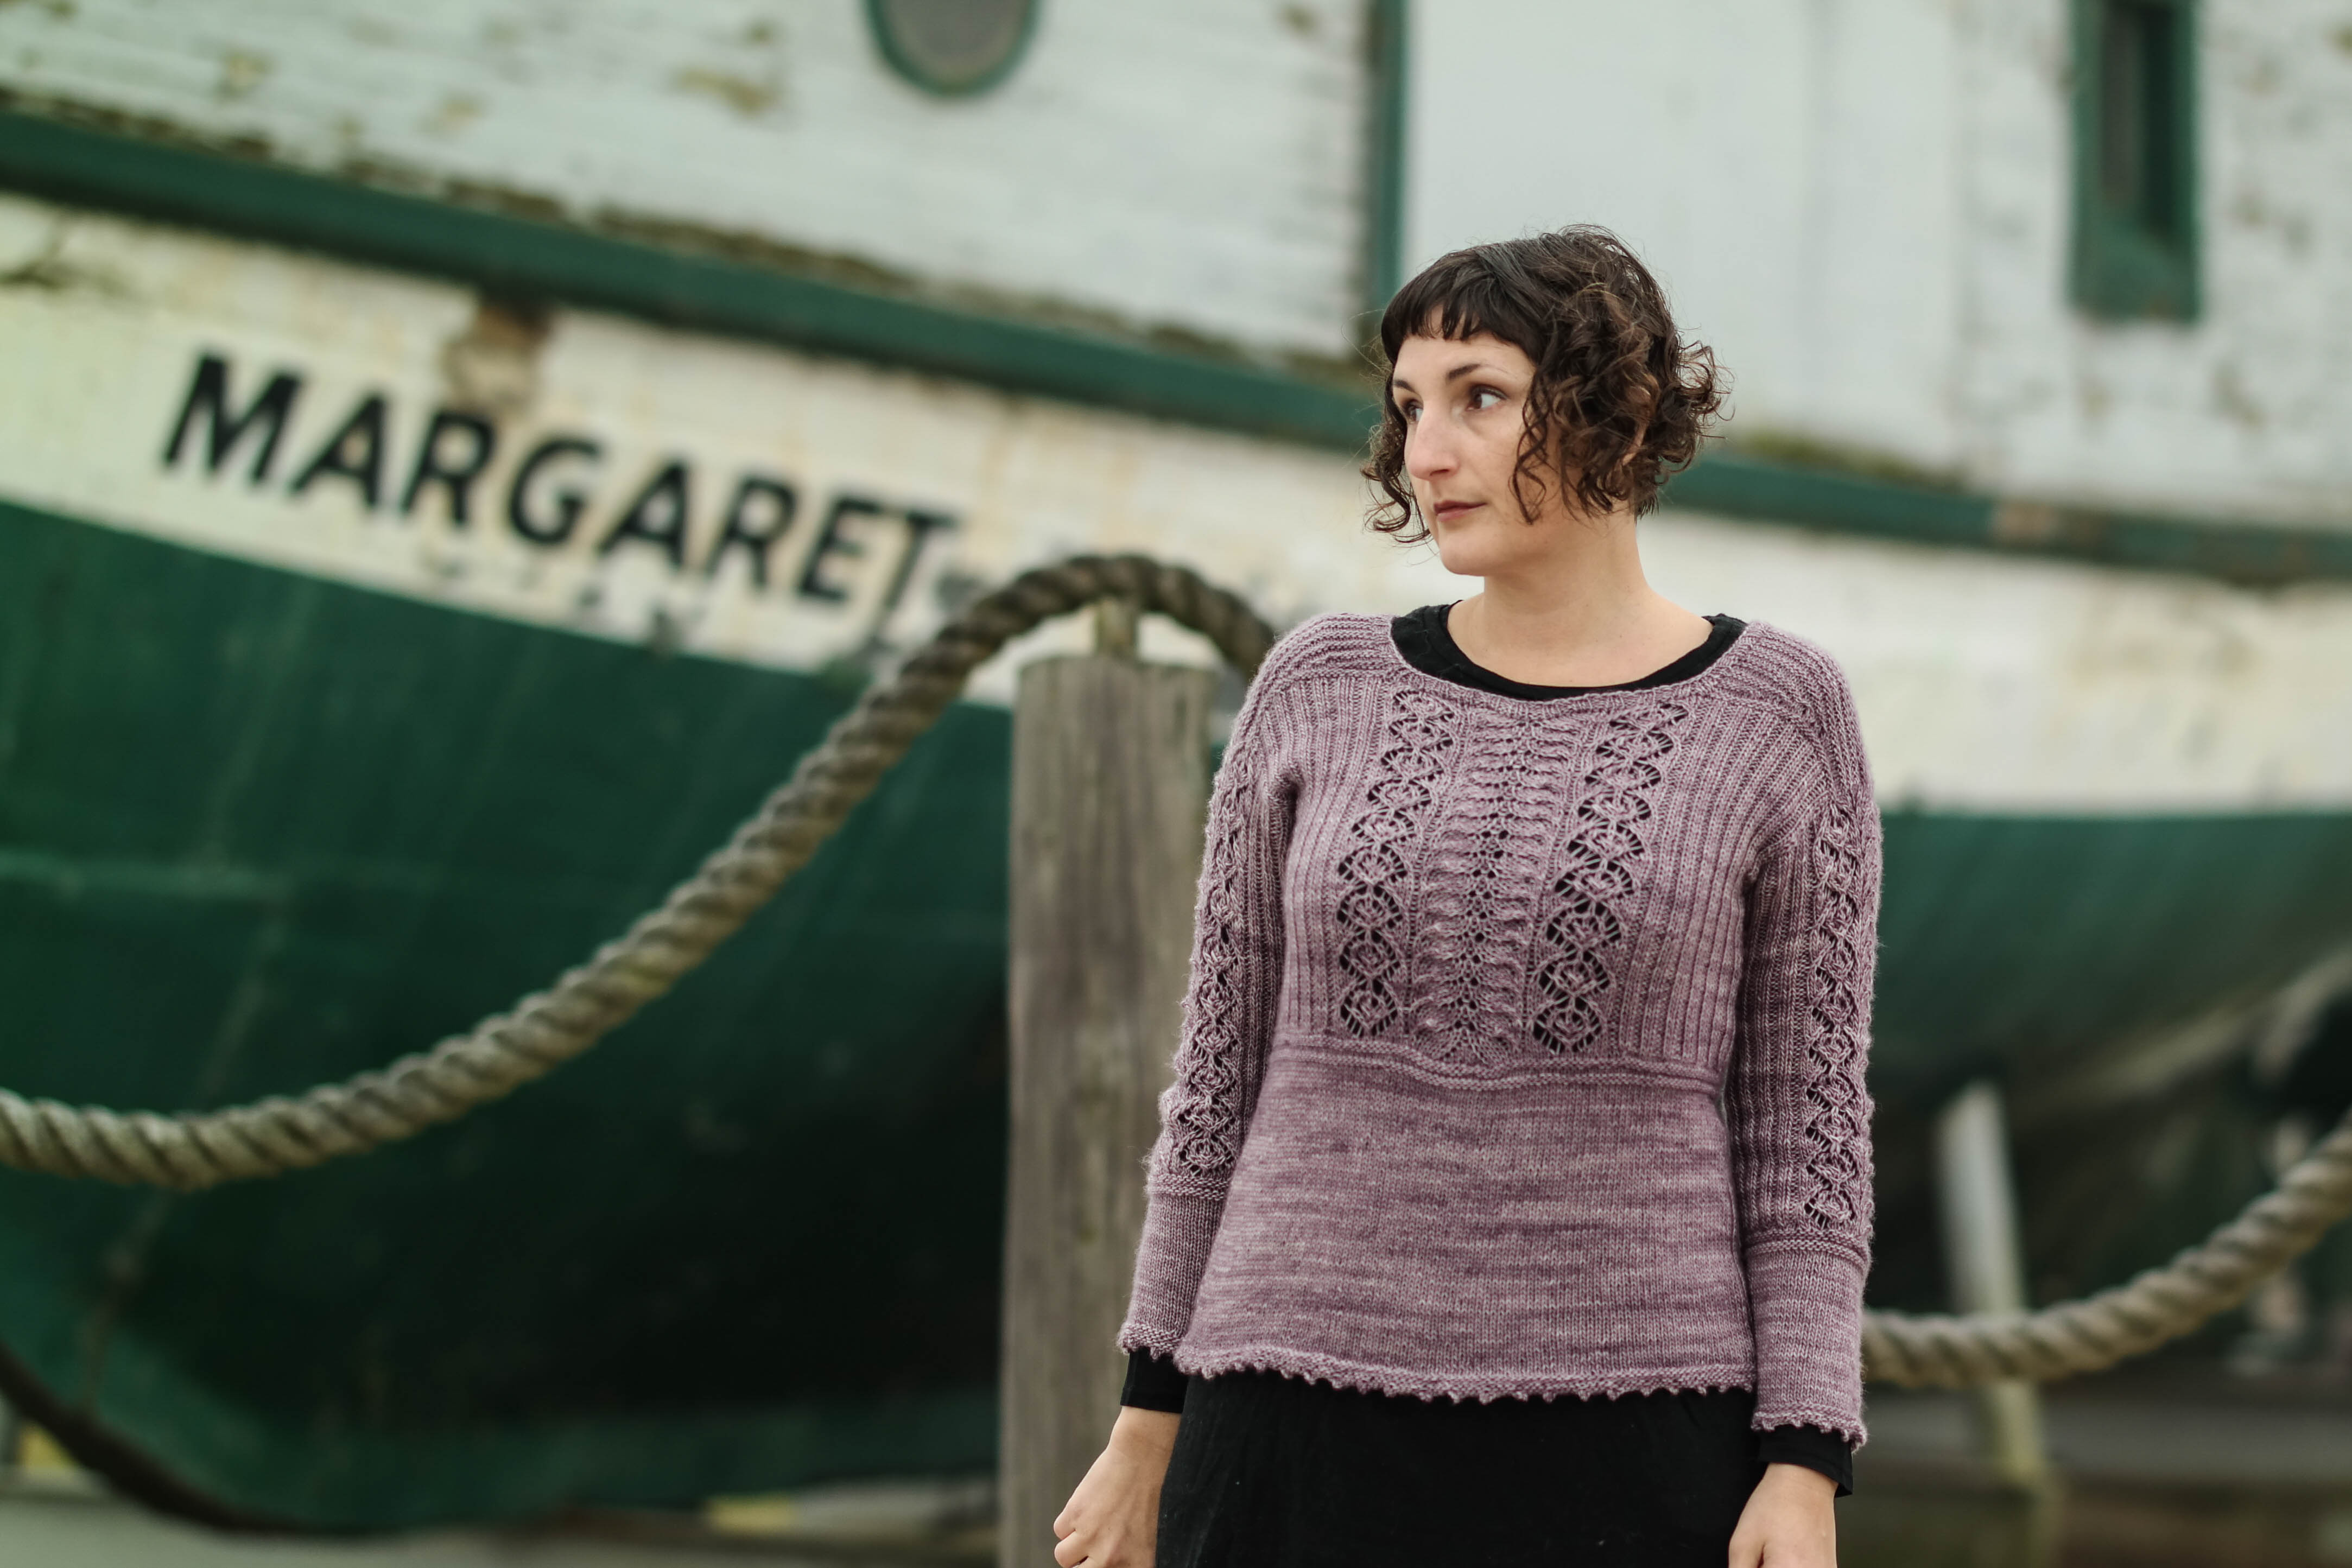
    Raglan yokes have a characteristic diagonal line between the shoulder and sleeve join. Although top-down raglans have become very popular, raglans can also be made seamlessly from the bottom up, or in pieces and seamed. It’s the diagonal join that makes it a raglan. The standard increase or decrease rate for a raglan yoke is 8 stitches every 2 rows or rounds; 2 stitches at every raglan line. This ratio works well for sizes with a chest circumference of around 40″/100 cm but will result in armholes that are too deep and neck circumferences that are too wide in larger sizes. Smaller sizes can have the opposite problem. To create a better fitting raglan a faster rate of increase, like 12 or 16 stitches for every 2 rows/rounds, can be used at the top to ease over the shoulders and at the bottom to curve around the underarms. If your size does not fall in the middle of the size range look for this type of saddle/raglan hybrid for a better fitting sweater.

    Round Yokes

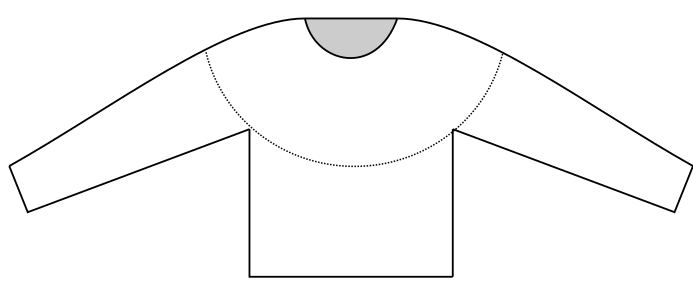
    This is a great construction for people with a non-standard bust-to-upper-arm ratio because there is no distinction between body and sleeves until the bottom of the yoke. Stitches can be borrowed from the body and moved to the sleeves for larger arms, or vice versa to accommodate a larger bust. Round yokes are shaped with several sets of increase or decrease rows or rounds, or sometimes in wedges. The shaping rounds should be more frequent near the neck opening to accommodate the width of the shoulders, with most of the shaping rounds occurring in the top half of the yoke. If the shaping rounds are evenly distributed throughout the yoke it will result in a cone-shaped yoke, causing the sweater to ride up at the neck because the circumference of the fabric isn’t large enough to fit around the shoulders.

    Drop Shoulders

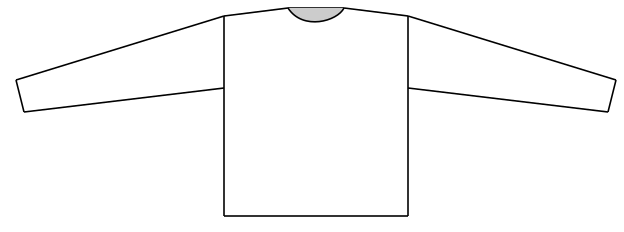
    The drop shoulder is a really simple construction that’s great for oversized or unisex sweaters. The shoulder line is meant to fall at the upper arm, not the shoulder break, so this style will work well for people with broad or narrow shoulders without any adjustments. One problem you might encounter with this style is sleeves that are either too long or too short. The top of the yoke forms part of the sleeve, so the length of the sleeve depends on how far down the arm the shoulder extends. Knitting the sleeves directly onto the sweater by picking up stitches around the armhole allows the sweater to be tried on and the sleeve length adjusted for a perfect fit.

    Set-In Sleeves

    Set-in sleeve construction follows the shape of the body more than the other styles. To get a really good fit the line where the sleeve is set into the shoulder should fall right at the shoulder break; where the shoulder bends when you extend your arm to the side. Because of this, it’s best to choose your size based on your shoulder width rather than chest circumference, and then make adjustments for the difference. Casting on extra stitches at the front neck when working from the top down, or decreasing additional stitches at the front neck when working from the bottom up can create extra fabric at the chest to accommodate a larger bust and narrow shoulders.

    Seamless set-in sleeve yokes can be worked in one piece from the bottom up or top down using decreases or increases to shape the sleeve cap and armhole simultaneously, or the front and back of the yoke can be shaped first with stitches picked up around the armholes and shaped with short rows to create the sleeve caps. Both methods can create a set-in sleeve yoke with a smooth shoulder and sleeve join that follows the curve of the shoulder joint and the underarm.

    I hope that this overview will inspire you to create seamless sweaters that fit your unique body shape and proportions, and embrace the inherent properties of knit fabric! What is your favorite sweater construction? Is there a particular modification that you always make to help your sweaters fit better? Please leave a comment!

    Thank you for knitting!

  • The Side-to-Side Join

    The Side-to-Side Join

    When knitting cardigans, stitches are often picked up and worked onto the front edges of the sweater for the button bands and button hole bands. Perfectly serviceable bands are created this way, and if care is taken to pick up the correct amount of stitches and work at the right gauge, the bands will work, but there are a few things that can go wrong. The bands may pucker (too few stitches picked up) or flare (too many stitches picked up). Ribbing, seed stitch, and garter stitch, all excellent band choices for their non-curling properties, have a tendency to spread width wise, which can cause perpendicular bands to droop.

    One way to avoid all of these problems is by working the bands in the same direction as the body of the sweater, parallel to the fronts. The same number of rows can be worked on the band as there are on the front of the cardigan, but at a tighter gauge, giving the bands just the right amount of stretch. Seed stitch, ribbing, and garter stitch are given a firm vertical tug, keeping their width-wise spread in check. A different color can be used, or even a different yarn. Bands like this are often sewn on, or sometimes stitches are picked up along the sweater fronts and bound off as the band is attached.  I think the side-to-side join is the neatest and easiest way to attach parallel front bands, but I rarely see it used, so I’ve illustrated the technique in steps below.

    Setup: Start by casting on the number of stitches needed for your band. Double pointed needles or short straight needles 1 or 2 sizes smaller than the needles used for the body of the sweater will work best.

    SAMSUNG CAMERA PICTURES

    Step 1: Insert the needle into the edge of your cardigan from front to back.

    SAMSUNG CAMERA PICTURES

    Step 2: Pull a loop through.SAMSUNG CAMERA PICTURES

    Step 3: Remove the loop from the needle and pull out enough yarn to comfortably knit the next 2 rows. The excess length will be removed later so this does not need to be exact.SAMSUNG CAMERA PICTURES

    Step 4: Work the first wrong-side row of the band with the bottom half of the loop.SAMSUNG CAMERA PICTURES

    Step 5: Work the second right-side row of the band with the top half of the loop and pull tight so the band is snugged up against the front.SAMSUNG CAMERA PICTURES

    Repeat steps 1 through 5 for the length of the fronts. Two rows are worked for every picked-up loop, so you will have to skip every second row on the sweater front for the band to have the same number of rows. If you are working a round neck cardigan, both bands can be worked first and continued into the neck band. For v-neck cardigans, the bands can continue around the neck edge to be joined at the back neck.

    Cardigans aren’t the only use for the side-to-side join! Anywhere you would would like to attach a parallel piece of knitting to an already finished piece this method will work. The cover photo and the photos below are examples of sweaters that I made using this technique.

    Garter stitch bands.
    Garter stitch bands.

    From the wrong side you can see hoe the band continues into the collar.
    The wrong side view, Here you can see how the band continues into the collar.

    Seed stitch bands.
    Seed stitch bands.

    The wrong side view.
    From the inside.

    SAMSUNG CAMERA PICTURES
    Knit 1, purl 1 ribbing seen from the right side on the left and the wrong side on the right.

    Let me know in the comments if you’ve seen this method before or if you’ve tried it yourself.

    Thank you for knitting!

  • Lucky Gansey

    Lucky Gansey

    Have you seen the new Crossings book from Knit Picks? It’s a collection of 12 sweaters and wraps all showcasing classic cables. My contribution to the book is the Lucky Gansey, an all-over cabled fisherman style sweater worked from the top down.

    Lucky Gansey shoulder shaping


    The sweater starts with a cable at the back neck which spans the saddle shoulders and continues down the sleeves. Shoulder shaping is worked into the saddles to keep the drop shoulders from becoming too voluminous or droopy.


    A side view of the sweater showing the underarm gusset


    The sweater is worked flat to the underarms, then the gusset stitches are cast on and the body is worked in the round to the hem. Underarm gussets are a classic element of fisher Ganseys, allowing sweaters to be form fitting without being restrictive.


    The cables at the front


    The Lucky Gansey gets its name from the cables I chose. The cables adorning the front and back of the sweater are knitted representations of horseshoes, wishbones, X’s and O’s, and honeycomb, all symbols of good luck.


    The pattern calls for Knit picks Wool of the Andes, an affordable, worsted weight, 100% wool yarn that is available in an expansive range of colors. The fisher Gansey shape was historically worn by men, and with a size range from 34″ to 55.25″ around the chest, this sweater could easily be made to fit a man or woman.

    Are you a cable knitter? Do you have your eye on one of the designs in this book? Tell me about it in the comments!

    Thank you for knitting!


  • Compass Points Pullover

    Compass Points Pullover

    The Compass Points Pullover was published in the Fall/Winter 2018 issue of knit.wear magazine. It’s a bulky cabled sweater featuring raglan shoulder shaping, a thick and cozy funnel neck, and a long tapered waist. Cascade’s Boliviana Bulky yarn makes the knitting speed by, so you’ll be dressed in a new, warm, winter sweater in no time at all!

    The pullover is worked from the top down beginning at the neck. After a few tries incorporating neck shaping into the cable patterns and raglan shaping, I decided to save the neck shaping for last, so all of the neck stitches are cast on at once and the body is worked in the round to the hem. The raglan increases are worked before and after a column of Stockinette stitch, which continues down the sides of the sweater and highlights the waist shaping.

    When the body of the sweater is finished sleeve stitches are picked up and worked in the round to the ribbed cuffs. The cable pattern starts at the neck and continues down the sleeve to blend seamlessly into the cuff ribbing.

    The funnel neck is picked up last and short rows are used to raise the back neck. I had originally planned to make the funnel neck shorter and a single thickness, but when it was finished it was just too floppy and didn’t look the way I wanted it to, so I made the neck band twice as long, folded it over, and sewed it to the inside. Perfect! The funnel neck is thick and cozy without hugging your neck in an annoying way.

    The Fall/Winter issue of knit.wear magazine is available now in print and digital formats.

    Thank you for knitting!

  • The Bristol Raglan and Holiday Sale!

    The Bristol Raglan and Holiday Sale!

    I’ve just added the Bristol Raglan to my Ravelry pattern store. This pattern was first published in the Spring 2017 issue of Interweave Knits magazine. I’ve revised the pattern to include written directions along with the cable charts, and I’ve changed the directions slightly to make it easier to follow the raglan shaping directions and cable patterns at the same time. This pattern and all of my other independently published patterns are 30% off the regular price now through November 27, 2018. You can see all the patterns on sale here. No code needed, just add the patterns to your cart and the discount will be applied automatically at checkout.

    The Bristol Raglan is a top-down seamless pullover, worked mostly in the round. The neck is cast on first, and worked flat to create a lower front neck line, then the piece is joined and worked in the round to the underarms. Simple cables adorn each raglan seam line, and stop just before the underarm separation.

    After the body and sleeves are separated, the body of the pullover is worked in stripes to the split hem. The front and back are separated, and the back hem is worked longer than the front. A little cable detail keeps the hem neat where it splits at the sides, and a purled phony seam on each side hides the jog from the color changes.

    Three-quarter length sleeves are worked in the round from the held sleeve stitches and a provisional cast on at the underarm, but working from the top down means you can easily change the length.The pattern is available in five sizes, from 37″ to 50 1/2″ bust sizes, and it’s worked in a worsted weight yarn. You can see all the details on the pattern page.

    Thank you for knitting!

  • Lake Geneva Sweater

    Lake Geneva Sweater

    The Lake Geneva Sweater is my design for the Winter issue of Knitscene. It’s a top-down, drop shoulder, V-neck sweater, made entirely without seams. The marled effect is created by holding two strands of fingering weight yarn together. For the sample I used Cascade Yarns Sorata in Charcoal and Silver. I love the simplicity of this design and I think it will be a fun and easy knit for both beginner and experienced sweater knitters. Worked at a worsted weight gauge, this sweater goes fast!

    Copyright Knitscene/Harper Point Photography


    One of my favorite features of this design is the way the shoulders are shaped. Drop shoulders can get a little droopy (think of big shouldered sweaters from the 1980s) unless they are tapered toward the sleeve, and that is usually achieved by working short rows. For this design I did something even easier; the shoulders are worked in garter stitch and the taper is created by gradually working more stitches in stockinette stitch until only the armhole border is worked in garter stitch. The shorter row gauge of garter stitch makes the length at the armhole shorter than at the neck edge.

    Copyright Knitscene/Harper Point Photography


    The V-neck shaping couldn’t be simpler from the top down. There is no need to cast on stitches for the front neck as you would for a round neck, instead increases are worked at the neck edge until there are enough stitches to join the fronts and work in the round. The V-neck shaping was carefully planned so that it doesn’t start until the garter stitch shoulders are complete, and the fronts are joined at the base of the neck on the same row the front and back are joined at the armhole. I’m not a fan of “at the same time” instructions, so I avoid them whenever possible!

    Copyright Knitscene/Harper Point Photography


    The body of the pullover is worked straight to the hem, and the sleeves are picked up and worked in the round from the armholes, so after doing the hard work of shaping the neck and shoulders it’s all mindless stockinette. There is a little column of garter stitches on each side, which acts as a faux seam and makes a fun detail. It is also repeated on the sleeves at the underarm. Ribbed cuffs and hem complete the sweater adding to the casual, comfortable feel.

    The Winter issue of Knitscene is available in the Interweave Store, and at bookstores and yarn shops all over. Thank you for knitting!


  • The Keeley Gansey

    The Keeley Gansey

    The Keeley Gansey was my first design submitted, and accepted to a magazine. It’s been over a year since the pattern was first published and that means that the distribution rights have reverted back to me. The pattern is now available as a PDF download from my Ravelry store, with revised directions and a a new sample in different yarn. I thought it would also be fun to look at the design process, which started two years ago with the design submission call from Interweave Knits magazine.

    This is an excerpt from that call:

    “Give us your best Arans, Fair Isle pullovers, ganseys, Nordic ski sweaters, Icelandic yokes, Bohus yokes, and more. Show us rich texture and colorwork in traditional shapes: drop shoulders, underarm gussets, unshaped bodies, steeks, picked-up sleeves, circular knitting. What subtle details can you introduce to make the looks modern without totally redesigning the archetype?”

    I was intrigued, and decided to design a Gansey, but instead of making it the traditional way from the bottom up, I would start at the top and work down. I also decided to use lace patterns instead of the traditional knit and purl patterns or cables. Lace patterns are sometimes used on Ganseys, but I wanted this design to be especially feminine by adapting traditional Gansey elements to flatter a woman’s figure.

    I started with this swatch:

    And this sketch:


    I also included two pages of notes, a detailed schematic, and a hand drawn assembly diagram. I wanted to be sure that the magazine editors had as clear a picture of my idea as the one I had in my head. I was still surprised when my design was chosen for the issue.

    Lisa Shroyer, the editor at the time, discussed a few different yarn options with me and we settled on Dale of Norway Heilo, a sport weight 100% wool yarn in a natural oatmeal color. The yarn was a little thicker than the yarn I had used in my swatch, causing the lace to have more of a textural quality and creating a denser fabric than I had imagined. The design still turned out beautifully and I was really pleased with the result!

    Copyright Harper Point Photography

    The magazine was first published in November 2016, and a year later I had the option to publish my own version of the design on Ravelry and anywhere else. I wanted to see how the sweater would look in a finer yarn at the same gauge, so I pulled some of my favorite yarn out of my stash, madelinetosh Tosh Merino Light, and knit a second sample while revising the pattern to fit my style sheet.

    You can see in the new Keeley Gansey that the lace pattern is much more open and the fabric has a bit more drape. I think the pattern works great in either yarn! It took me longer than I wanted to finish the revisions, but the new PDF version also includes written directions as well as a chart for the lace panels, and an assembly diagram for the shoulder straps and neck cast-on. The pattern photos were taken at the Algoma Marina, with Margaret, a historic fishing tug, in the background. I think it’s the perfect setting for this Fisherman style sweater.

    Thank you for knitting!


  • Jean’s Jacket And A Provisional Underarm Cast-On

    Jean’s Jacket And A Provisional Underarm Cast-On

    I released a new pattern yesterday! Jean’s Jacket is a seamless, top-down cardigan with lace details. It starts at the ribbed collar which transitions into the lace and cable pattern on the sleeves and fronts. The shoulders are shaped using different rates of increase to create an S-curve rather than the typical diagonal raglan lines. The button band is worked along with the body of the sweater with buttonholes worked right into the pattern. You’ll find all the details, and a 25% discount through January 12, 2017 on the pattern page.

    When the shoulder shaping is finished the sleeve stitches are set aside, underarm stitches are cast on, and the body is worked down to the ribbed hem. I like to use a provisional cast-on for the underarms because it’s easy to pick up the stitches later and it keeps the underarm stitches from being too tight. First I slip the sleeve stitches onto waste yarn and then I use the waste yarn to provisionally cast on the underarm stitches. I took some photos so you can see exactly  how I do that.

    The sleeve stitches are held on waste yarn (in pink) and the working yarn is ready to cast on the underarm stitches.


    Bring the needle under the waste yarn and over the working yarn…

    then back under the waste yarn to create a loop on the needle. This is the first stitch.

    Now make a yarn over. This is the second stitch.

    Keep alternating the last two steps until all the underarm stitches are cast on, then continue working on the body stitches.

    When you’re ready to return the sleeve stitches to the needle just slip the provisionally cast on stitches onto the needle too. You will notice that every other underarm stitch is mounted with the right leg to the back of the needle. You will have to turn the stitches the right way around by working into the back loop on the first row.

    Thank you for knitting!

  • The Blowout Cardigan and Weaving In Ends With Bulky Yarn

    The Blowout Cardigan and Weaving In Ends With Bulky Yarn

    I made the Blowout Cardigan for the Winter issue of Knitscene magazine. It’s a fun little cardigan worked in bulky yarn with a lace pattern on the sleeves; the perfect thing for holiday parties and cold weather layering. The bulky wool, Universal Yarns Deluxe Superwash Bulky, is soft and easy to work with, but it did present a challenge. I usually attach new skeins using the wet splice method, but I didn’t think the ends would felt together well enough in superwash wool. Simply weaving in the ends wouldn’t do either, because the yarn is so thick it would leave a noticeable bulge wherever I attached a new skein. Instead I used the method shown below, I don’t use it often, and I thought it would be unusual enough to merit a photo tutorial.


    SAMSUNG CAMERA PICTURES
    When it’s time to attach a new skein drop the old yarn and pick up the new yarn leaving about a six inch tail of each. I like to tie an overhand knot to keep the tension even in this spot, but I take it out before weaving in the ends.


    SAMSUNG CAMERA PICTURES
    Using a tapestry needle weave each end into the stitch next to it to close up the small hole where skeins were changed.


    SAMSUNG CAMERA PICTURES
    Now comes the fun part! Separate the plies of both strands of yarn. The yarn I used was a 4 ply, so there are 8 single plies to weave in.


    SAMSUNG CAMERA PICTURES
    Using a sharp needle weave in each end by skimming the needle diagonally through the backs of the stitches. First in one direction…


    SAMSUNG CAMERA PICTURES
    and then back the opposite way.


    SAMSUNG CAMERA PICTURES
    When all the ends are woven in it will look like this.


    SAMSUNG CAMERA PICTURES
    Clip the excess yarn and you’re done!


    knitscene-winter-2016-0469_medium2
    copyright Knitscene/Harper Point Photography

    It may seem like a little extra work, but weaving in ends this way produces such a neat result that it is totally worth it!

    Thank you for knitting!

  • The Augusta Cardigan – Construction And Fit

    Since the Augusta Cardigan was published I’ve received quite a few questions about how to choose which size of this sweater to make. Although it’s called a cardigan, this piece is really more of an over-sized shrug, or what’s sometimes called a cocoon. While I was working on this pattern I posted this rather cryptic photo on Instagram showing my experiments with the shape and construction.


    The sweater starts as a rectangle, with the sides of the rectangle forming the sleeves and sleeve seams, (you can’t see the sleeve seams on the finished piece because they’re grafted together invisibly) and the top and bottom of the rectangle forming the back neck, the front edges, and the back at the hip. In photo 1 below you can see how the piece looks flat, before joining the sleeve seams. I marked the points that are joined with the letter A on one side, and the letter B on the other. In photo 2 there’s a piece of tape over one of the A’s, and in photo 3 that side is folded and A is joined to A. In photo 4 the other side is joined as well.

    1-kephren-knitting-studio

    After the sleeves are joined and the basic shape of the piece is formed, stitches are picked up along the bottom edge and worked in a rib and cable pattern. You can see this section in the photo below. The number of stitches picked up is different for each size, and the width of this panel is what determines the hip width, which should be close to, or the same as half of your hip circumference. The other point on the sweater that needs to come close to your actual measurement is the sleeve circumference at the elbow, which is determined by how many stitches are left at the opening after joining the sleeve seams.

    Copyright Harper Point Photography
    Copyright Harper Point Photography


    These two points should help you to choose a size, but if you are still unsure, have a look at the back length. Because of the way it’s constructed, the width and the length have to increase proportionately, so the larger sizes are also longer at the back. Because of the way the cable panel is worked, there are only a few rows that are good stopping places in the pattern, so there are three different back lengths for the six sizes.

    Remember that this is an open and loose style and the fit doesn’t need to be exact! If you’re still having trouble deciding on a size, you can ask your questions in the Kephren Knitting Studio Ravelry group, or in the comments at the end of this post. I’m excited to see finished and in-progress Augusta Cardigans popping up, so be sure to tag me on Instagram or Facebook (@kephrenknitting) if you share your pictures there.

    Thank you for knitting!